What is Autoresponder in cPanel

Autoresponder is a feature that allows you to set up automatic email replies to incoming messages sent to a specific email address. It’s commonly used to inform senders that you are unavailable or to acknowledge receipt of their message.
Table of Contents
Here are key points about autoresponders in cPanel:

- Automatic Replies: An autoresponder sends pre-written messages automatically in response to incoming emails.
- Configurable Settings: You can set the start and end dates for when the autoresponder should be active.
- Customizable Message: You can customize the content of the autoresponder message, including using HTML for formatting.
- Interval Control: You can set intervals to control how often the autoresponder sends replies to the same email address within a specified time frame.
- Character Set: Allows you to specify the character encoding for the autoresponder message.
- Usage Scenarios: It’s often used for informing contacts about vacations, acknowledging receipt of emails, or providing information about changes in email contact methods.
- Easy Setup: Setting up an autoresponder in cPanel involves filling out a form with the necessary details such as email address, message content, and timing preferences.
- Visibility: Users can manage and monitor their autoresponders directly within the cPanel interface, making adjustments or turning them off as needed.
- No Email Forwarding: Unlike email forwarding, which redirects emails to another address, an autoresponder sends an immediate, predefined response to the sender.
- Practical Applications: Businesses and individuals use autoresponders to maintain communication with clients or contacts when they are away from their email for extended periods.
How to Set an Email Autoresponder in your cPanel

Log in to cPanel
Access your cPanel using your domain URL followed by /cpanel and enter your username and password.
Navigate to Email Autoresponders
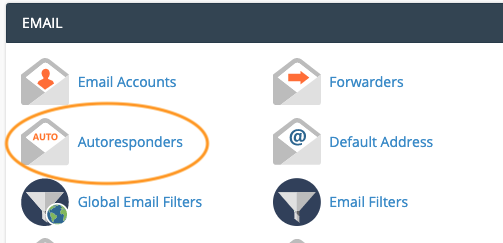
Once logged in, scroll down or use the search bar to locate the “Email” section.
Access Autoresponders:
Click on the “Autorespond
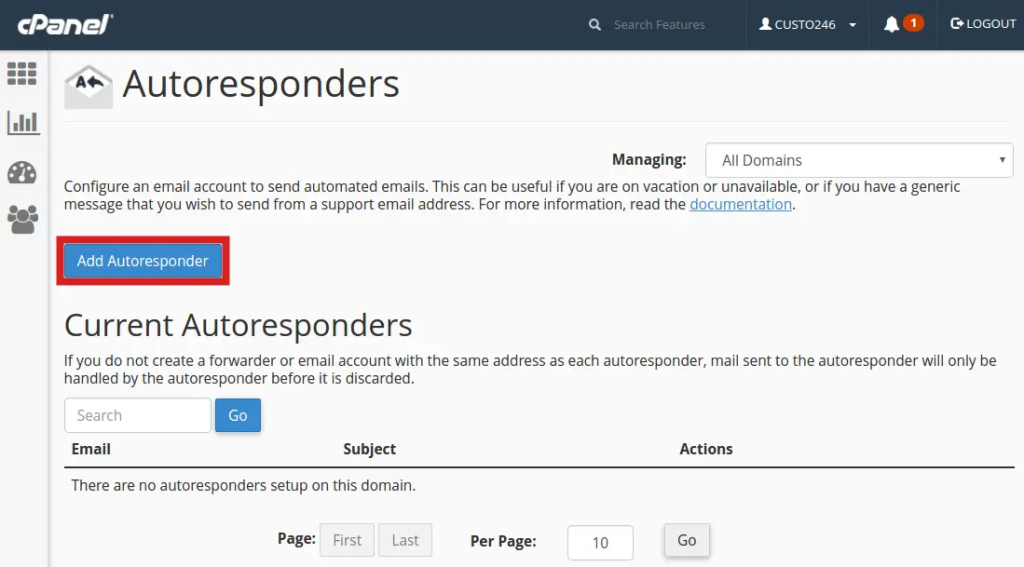
Add Autoresponder:
On the Autoresponders page, click the “Add Autoresponder” button.
Configure Autoresponder Settings:
Fill in the details:
- Email: Enter the email address for which you want to set up the autoresponder.
- From: Name displayed as the sender of the autoresponder email.
- Subject: Subject line of the autoresponder email.
- Body: Message content of the autoresponder, including any necessary HTML formatting.
- Interval: Set how often the autoresponder should send replies to the same email address.
- Start and Stop Time: Set the period during which the autoresponder should be active.
Set Character Encoding:
- Choose the character set, typically “utf-8”.
Enable HTML (optional):
- Check the box if you want to use HTML in your autoresponder message.
Save Settings:
- Click the “Create/Modify” button or equivalent to save your autoresponder settings.
Verify Autoresponder Setup:
- Once saved, verify the autoresponder by sending a test email to the configured address.
Review and Adjust as Needed:
- After setup, review the autoresponder’s functionality periodically to ensure it meets your needs. Adjust settings if necessary.
These steps should guide you through setting up an email autoresponder effectively using cPanel.