What are MX records?

MX (Mail Exchange) records are DNS (Domain Name System) records that specify the mail servers authorized to receive email on behalf of a domain. They are used to route incoming email to the correct mail server. MX records include a priority value, which determines the order in which mail servers should be used if multiple servers are specified. The record ensures reliable and efficient email delivery by directing email traffic to the designated servers based on their priority.
Table of Contents
How to Create an MX Record in DNS
Creating an MX (Mail Exchange) record in DNS involves accessing your domain’s DNS management settings and adding the necessary details. Here’s a step-by-step guide to help you through the process:
Step-by-Step Guide to Creating an MX Record
- Log In to Your DNS Management Interface:
- Visit your domain registrar or DNS hosting provider’s website.
- Log in with your account credentials.
- Navigate to the DNS Management Section:
- Look for a section labeled “DNS Management,” “DNS Settings,” or something similar.
- Select the domain for which you want to create the MX record if you have multiple domains.
- Add an MX Record:
- Look for an option to add a new record. This might be labeled “Add Record,” “Add MX Record,” or similar.
- Choose “MX” from the list of record types.
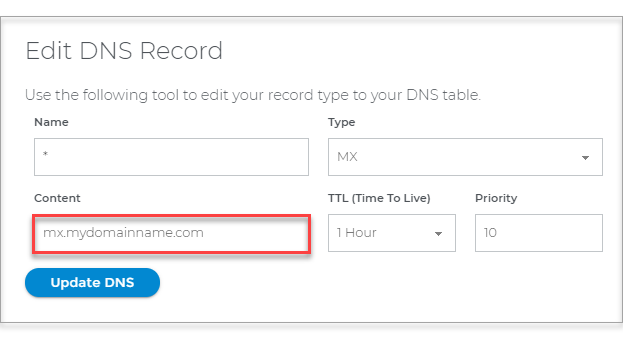
- Enter the Details for the MX Record:
- Name/Host: This is often left blank or set to “@” to represent the root domain, but it can also be a specific subdomain if you want to set up MX records for a subdomain.
- Priority: Enter the priority value for the mail server. Lower numbers indicate higher priority.
- Mail Server/Value: Enter the fully qualified domain name (FQDN) of the mail server (e.g.,
mail.example.com).
- Set the TTL (Time to Live):
- TTL specifies how long the record should be cached by DNS resolvers. Common values are 300 seconds (5 minutes), 3600 seconds (1 hour), or 86400 seconds (24 hours).
- Enter the desired TTL value. If there’s a default, you can usually leave it as is unless you have a specific reason to change it.
- Save the Record:
- Review the information you have entered.
- Click “Save,” “Add Record,” or the equivalent button to save your new MX record.
Example
Here’s an example of what the fields might look like:
- Type: MX
- Name: @ (or leave blank for root domain)
- Priority: 10
- Mail Server: mail.example.com
- TTL: 3600
Verify the MX Record
After adding the MX record, it’s important to verify that it has been correctly added and propagated. You can use tools like:
- Online DNS tools: Websites like MXToolbox (https://mxtoolbox.com/) allow you to check MX records.
- Command Line: Use the
digornslookupcommand to query the MX records for your domain.

or

Notes
- Propagation Time: DNS changes can take some time to propagate. This can range from a few minutes to up to 48 hours, depending on the TTL value and other factors.
- Multiple MX Records: If you have multiple mail servers for redundancy, repeat the steps to add additional MX records with different priorities.
By following these steps, you can create MX records to ensure that your domain can properly receive email.